Do you use Facebook ads to boost your business?
Are you confused by the latest changes?
Recent changes made to Facebook’s ad campaign structure can affect how you set up and test your ads.
In this article you’ll discover how to set up a Facebook ad campaign in the new structure.
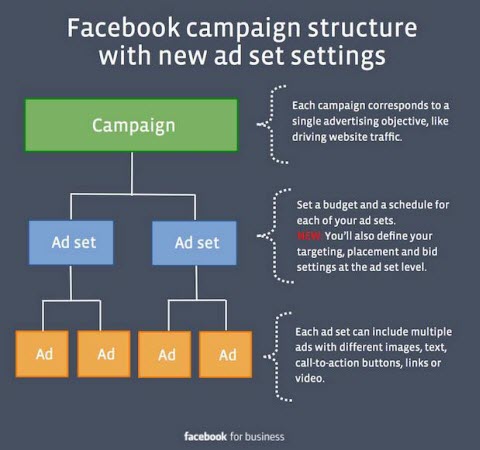
The biggest change is that budget, schedule, bidding, targeting and placement of your ads are all configured at the ad set level. Only the images, copy, call-to-action button and Facebook page are configured at the ad level.
So if you are split testing your ads and changing a variety of things, you may need to set up multiple ad sets, as well as multiple campaigns.
Here are some examples of when you need a new campaign, new ad set or just a new ad for the different things you might split test.
Split testing that requires a new campaign:
- Different website landing pages
- Different types of ads (i.e., promoted post vs. website conversion)
Split testing that requires a new ad set:
- Different bidding models
- Different targeting
- Ads that you want to run automatically on a particular individual schedule (i.e., one ad runs on Sunday and one ad runs on Monday—to turn these on automatically individually, they both need their own ad set)
Split testing that only requires new ads:
- Different image
- Different copy
- Different call-to-action buttons
- Using a different Facebook page for website clicks or website conversion ads
Most of the other changes are more cosmetic in the layout. Facebook has simplified the setup so it’s more aligned with the new structure. They have broken the setup into three steps:
Step 1: Create your campaign
Step 2: Create your ad set
Step 3: Create your ad
Notice that you can name your campaign and ad set at the end of the step. Give them a meaningful name to easily see which ads are doing well in the Reports area.
To set up an ad in the new Facebook ad structure, follow these steps after you go to https://www.facebook.com/ads/create/.
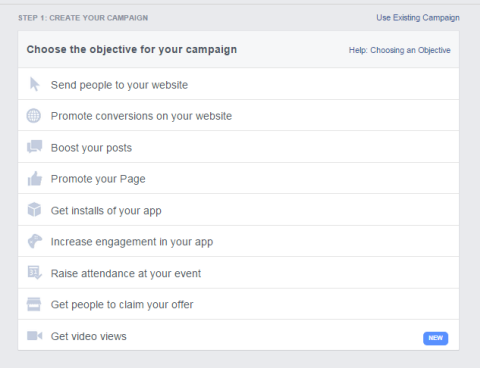
#1: Choose the Objective
This will be the objective of the campaign. Notice the language has changed a bit on the selections here.
Notably, the Page Post Engagement selection has been changed to Boost Your Posts. This may be confusing for people who are more used to the promoted posts vs. boosted posts language.
The benefit of setting up the Boost Your Post ad here within the Ads Manager is that you can configure the ad to boost the post to only your fans, rather than boosting to People who Like your Page and their Friends when you use the Boost Post option directly on your Facebook page.
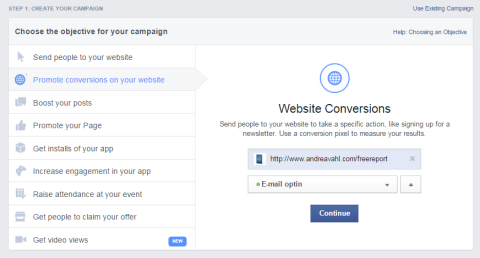
#2: Enter Objective Details
After choosing an objective, you make other selections related to your objective such as entering a website address, selecting a conversion pixel or selecting which event to promote.
In this example, I chose to promote conversions on my website and had to select the corresponding active website conversion pixel.
#3: Name the Campaign
Once you click Continue after entering the objective details, you can name your campaign. Facebook gives it a name by default based on the objectives, but you can change the name to something meaningful to you.

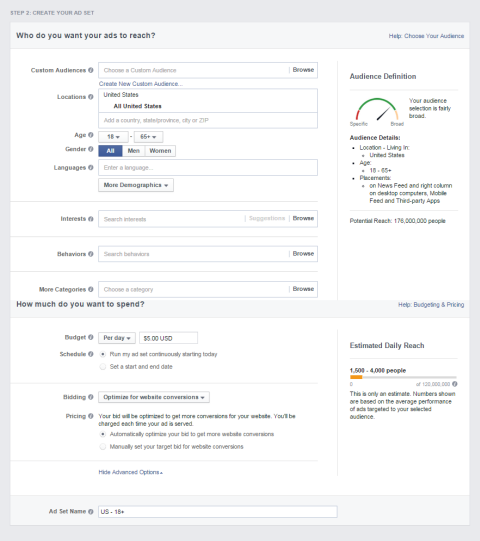
#4: Design the Ad Set
Next, you set up the targeting, bidding and budget for your ad set. While the order of the setup has changed to be more in line with the flow of the new structure, the targeting has not changed.
Remember that the ads below the ad set will all share the same bidding model and budget.
Facebook does optimize the ads below the ad sets so the better-performing ads get more of the budget. Be aware that one of your ads may be shown less often. You can manually control the ads below the ad set by turning them on and off as you require.
#5: Design the Ad
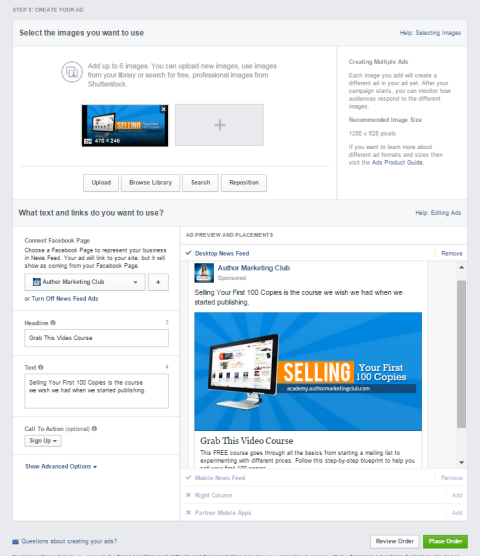
The last step is to design your ad.
If you’re only going to change the ad image for split testing, you can add multiple images here and multiple ads will be created with the different images. Then Facebook will split test them and optimize the campaign to show the best-performing ad more often.
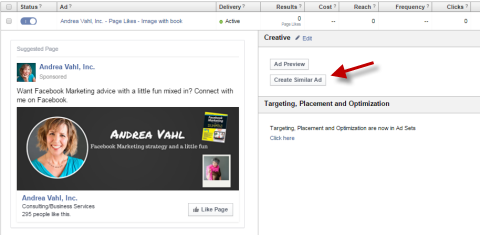
If you are changing the text or the call-to-action button for split testing, you can easilycreate a similar ad after the first one has been created.
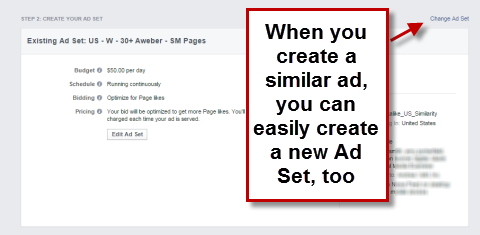
And if you need to adjust the bidding model or targeting for an ad set, you can click Change Ad Set after you’ve created the similar ad.
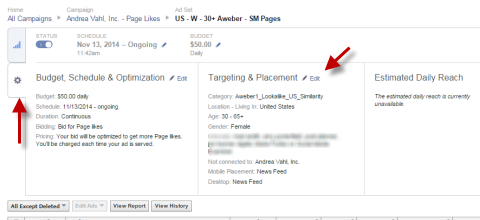
You can still edit the ad after it has been created. Click Edit next to the Creative area or if you need to adjust anything in the ad set, click the wheel and then edit.
Additional Tips and Pointers
Every ad account is limited to 1,000 campaigns, 1,000 ad sets and 5,000 ads. If you hit the limit, you can delete campaigns, ad sets and ads. Each ad set is limited to no more than 50 non-deleted ads.
Make sure you know when Facebook is optimizing your ads for you and when you need to watch your ad optimization.
For example, the two ads below are in the same ad set, but they were created before the migration so they have different target audiences. You can see that the ad with a worse cost per like was taking more of the budget for the day. In an instance like this, you need to manually turn off the ad that’s performing worse.
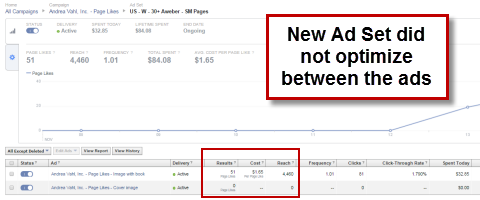
In the new ad sets, Facebook is supposed to optimize so that the ad with the better conversion gets more of the budget, but I suggest watching those stats to see if you agree. I created a Campaign with two different images in the Ad sets and one ad did not show at all while the other ad got the entire budget.
Wrapping Up
The new setup flow for campaigns, ad sets and ads does seem to be easier to understand. As marketers, we need to embrace the change, while finding ways to keep our costs low, such as split testing and optimizing our budget to fit our goals.
If you have current ads, you can run them as they’ve been set up, but all ads will be migrated to the new structure sometime after January 2015. Any new ads you set up will use the new structure.
You can read more about the new campaign structure on the Facebook for Business site.
What do you think? Have you tried the new Facebook ads campaign setup? Share your thoughts with us in the comments below.
Note: This article originally appeared on Social Media Examiner and is reprinted with permission.

