
![]() Have you wondered if Facebook Advertising can work for you? If you create an ad and use a conversion pixel then you will know exactly how valuable Facebook ads can be for your business.
Have you wondered if Facebook Advertising can work for you? If you create an ad and use a conversion pixel then you will know exactly how valuable Facebook ads can be for your business.
A conversion pixel is basically a piece of code that you install on a web page. When you create a Facebook Ad, you “tie” the pixel to the ad so that if someone comes from the Facebook ad and arrives on the web page that has the conversion pixel Facebook then tracks a “conversion” to that ad.
You typically want to ad the pixel to a “thank you” page where someone arrives after they have completed the desired action. So if you would like someone to opt in to your newsletter, you send the traffic to the place on your website where they sign up, and after they have entered their e-mail then you might send them to a page on your website that says “thank you for signing up”.
Or if you want them to purchase a product, you send them to the sales page, and after they have completed the sale, you send them to a “thanks for purchasing” page. The conversion pixel should be placed on the “thank you” page so that you know the desired action has been completed.
Facebook already naturally tracks the clicks to the website and the conversion pixel is used to track a series of actions.
There are a few things you have to have in order to use Facebook conversion pixels:
1. A website you control where you can place the conversion pixel. If you are using a different website such as Eventbrite for your event registrations, you will not be able to place code on that site to track signups that come directly as a result of the Facebook ad.
2. A web page that indicates the desired action has been completed. You need to have a final page that indicates the sequence of actions has been completed. For example, sometimes people have an e-mail optin but they aren’t directing anyone to a final web page after the person has subscribed. If you don’t have a final page that you are directing them to after they sign up, then there is no where to put the pixel. For example I have a thank you page I send people to after they have signed up for a webinar and I place a pixel code there so that I know the Facebook ad about the webinar is successful: https://www.andreavahl.com/thanks-for-signing-up
If you have these two requirements, then you can use a conversion pixel to track conversions with Facebook Ads.
Creating a Conversion Pixel
Your first step is to create the conversion pixel. You can do this within the Facebook Ads Manager area, you don’t need to use the Power Editor. I’m a big fan of using the Ads Manager more than the Power Editor and you can see my article: When You Need the Power Editor and When You Don’t.
To get to the Ads Manager, go to the upper right corner, click the down arrow, and select Manage Ads. Or just go here: https://www.facebook.com/ads/manage/
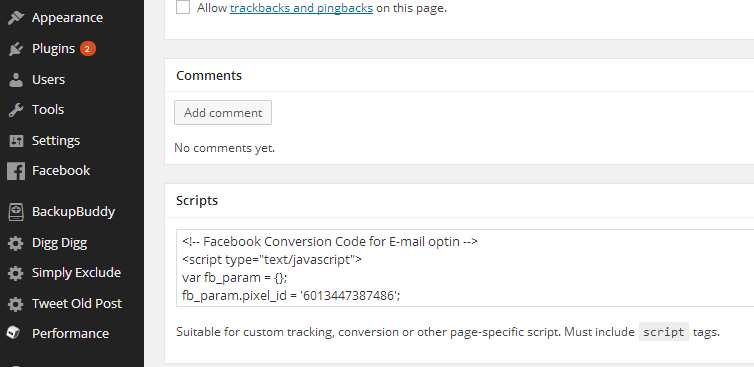
Then select Conversion Tracking on the left sidebar.
![]()
In the upper right corner, select Create Pixel
![]()
You then see a popup box that asks you to name the pixel and choose the category. The name and the category are for your use only. Choose something descriptive so that you know exactly where the pixel is being placed and how it’s being used.
![]()
When you select Create Pixel, another popup box appears with the code. Copy and paste this code into your web page that indicates the desired action has been completed – the “thank you” page.
![]()
If you have an HTML website you can place it between the <head> and </head>. If you have a WordPress site, some themes have a Footer or a space for Scripts.
Or if you don’t have that, I have placed the code on the Text area of the WordPress page and it works fine.
Once you have placed the pixel code on the desired page, you may have to “Activate” your pixel by visiting that web page. If the pixel goes to an Inactive state that means no one is visiting that web page. All you need to do to reactivate it is to visit that page.
Using your Conversion Pixel
Once your pixel is installed and activated, you are now ready to use it in an ad.
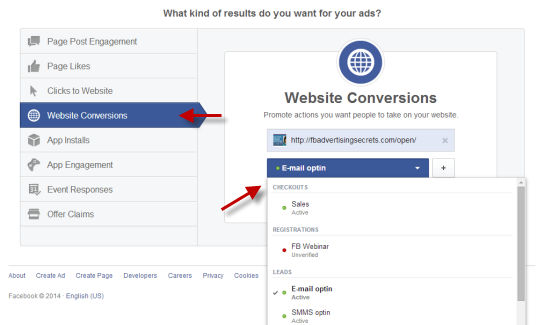
Start by creating an ad using the Website Conversions goal.
Next, add the website you are sending people to for the sale, signup, or whatever you are tracking.
Then select the conversion pixel from the drop-down menu.
Select your targeting for your ad just as you would for any ad that you do. Remember that split testing your ads will help improve your results.
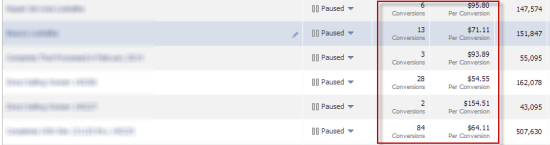
Analyzing Your Results
When you select Website Conversions as your goal, you will naturally see the cost per conversion in the basic reporting area but you should dive a bit deeper into the Facebook Reports so you can really see what is working for you.
I hope this has been helpful. I also have a full course on Facebook ads called Facebook Advertising Secrets if you want to learn more.
Let me know if you have tried Facebook’s Conversion Pixels and how they have worked for you in the comments below!


Simple and concise explanation Andrea. I know the Power Editor scares a lot of people so being able to do it through the Ad Manager should help a lot of folks.
This is a really helpful guide if you’re just getting started with Facebook ads. Facebook’s help files don’t make it really clear that the pixel code needs to go on the thank you page, so the first time I used one I put it on the landing page I got a number that made no sense!
Any tips for Facebook or Google Display Ads or even AdRoll using Eventbrite?
Hi Andrea, I dont have access to my html, do I have to have this pixel for it to work? Can I just do the conversion advertising without the pixel?
No, unfortunately, you can’t specifically measure conversions without being able to place that code on a thank you page on your website. You can just do a website click ad and optimize around cost per click. Hope that helps!
Thanks!