 I’m a little hot under the collar here because I see a lot of people wasting their money on Facebook Ad campaigns. I love to pinch my pennies and we don’t need to be giving Facebook any more of our hard-earned money than necessary.
I’m a big believer in Facebook Ads because they can work really well! You can grow your business, gain more exposure, and get more e-mail subscribers with these highly targeted ads. But you have to be smart!
Facebook Ads have gotten a tad more complicated because they have so many places to spend your money. You can Boost your post (formerly known as Promoted Posts), you can run a News Feed Ad, or an ad in the right column, or Promote a Page Post – whew!
But today I want to talk about the best type of ad to grow your Facebook Page – get more Fans or Likes. And save money! I love those cheap likes! Now I don’t like to refer to my fans as cheap because I love ’em but who doesn’t want to save money?
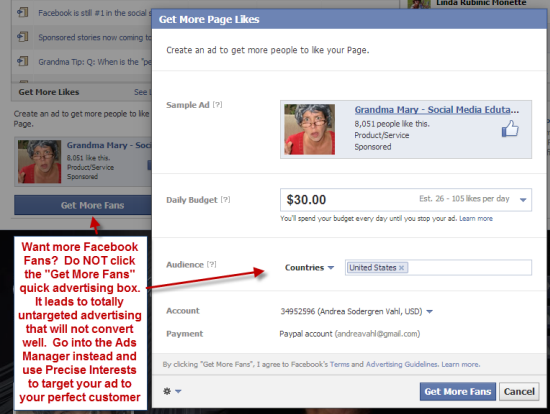
First let’s talk about what NOT to do. Do not select the Get More Fans button that appears on your Facebook Page Admin panel! This results in a totally untargeted ad that will waste your money.
Instead, you want to go into the Facebook Ads Manager area to create your Ad (there are more advanced strategies with Facebook Ads, such as using the Power Editor but we are starting with some baby steps first!) Let’s take this step by step:
Step 1: Go to the Facebook Ads Manager
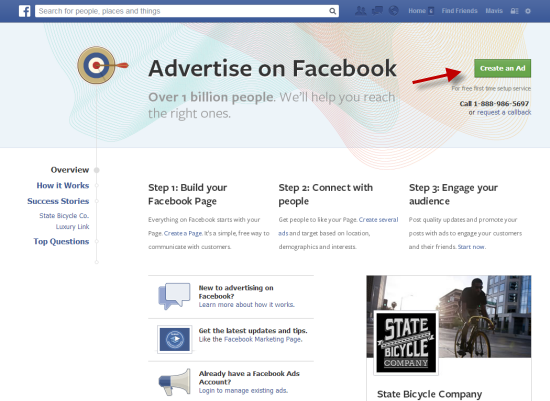
If you’ve never created an Ad before, go www.facebook.com/advertising because they have some helpful resources there. Plus, they will help you set up your service for the first time if you like! Once you’ve checked out the resources, you can click the Green Create an Ad button.
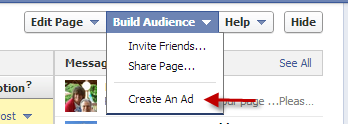
Or you can just select the Create An Ad selection under your Build Audience drop-down menu on your Page.
Now you are directed to a Page where you can get your Ad started.
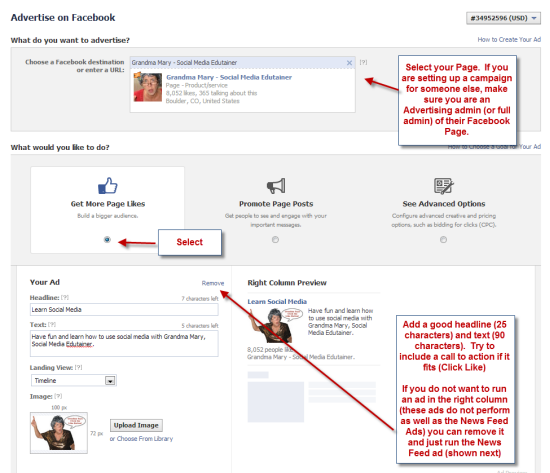
Step 2: Select your Fan Page and write your Ad copy.
To build your Fans, select your Fan Page. If you are running a campaign for someone else, make sure you have Advertising Admin privileges on the Facebook Page or higher.
Select the Get More Page Likes option and you can write the Ad copy for the Right Column ad. Make sure your Ad photo doesn’t contain more than 20% text or it will not be approved.
Note: The Right Column Ads don’t perform as well as the News Feed Ads. But if you haven’t tested these out before, it’s worth experimenting with them. I know people don’t always like the News Feed ads but Facebook offers them and they will be your cheapest source of clicks!
Ideally you are going to do some Split Testing on the types of ads you run, testing out different headlines and different demographics. Split testing is the best way to bring your costs down because you will test what types of ads convert better for you. Take a look at my post on How to Split Test your Facebook Ad.
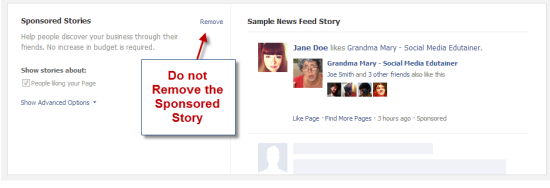
Step 3: Enable the News Feed Ad
The Sponsored Story that goes into the News Feed is on by default so this is really a non-step but I wanted to highlight the fact that you should absolutely keep this feature on. The Sponsored Story that goes into the News Feed will be your cheapest source of clicks. As I mentioned in the previous step, you can click Remove on the Right Column ad and only run the Sponsored Story but don’t remove the Sponsored Story!
Step 4: Select Your Targeting
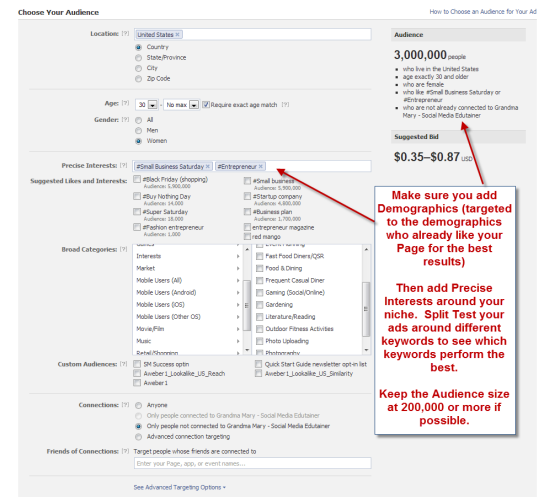
Selecting keywords for your targeting is key to narrowing the ad to reach your perfect customers. Start by selecting the Location, Age, and Gender of your audience. Use the Demographics from your current Fans found in your Insights to narrow this target down – you want to have the best chance of conversion in your ad.
Now you are going to experiment with some Precise Interests. Ideally, you are going to create multiple ads that will test these keywords so that you can find the best keywords that convert to the most Fans. Refer to the Split testing tutorial I had mentioned earlier: How to Split Test your Facebook Ad.
If you want to get an idea of how much this is going to cost you, you can go down to the Campaign Pricing area, and select Optimize for Clicks, then Manually Bid for Clicks. Now you will get a suggested bid range underneath your Audience number.
I like to keep the Audience at 200,000 or more for targeting so that you Ad can get some traction. The more clicks you get on your ad, the cheaper your Ad click price will be! If you are a local business and live in a small area then you obviously have to go with your local area which may not be as large.
Step 5: Set up your Campaign Pricing
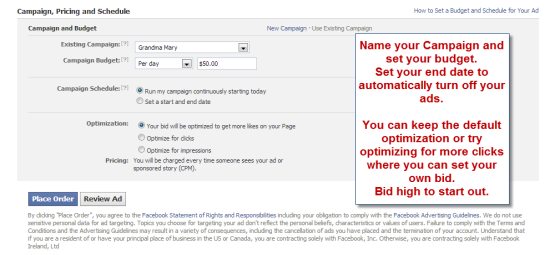
Now you name your price! If you are just starting out, it’s ok to stay with the default bidding model which set to Optimize for Page Likes which Facebook does for you. They use the CPM (Cost per Mille) model of bidding where you pay to show your ad to 1000 people. Or you can try the CPC model where you bid on the price you want to pay for each click. I have tested both and they both have performed decently for me but I prefer the CPC model. I encourage you do do your own testing. Learn more about CPC vs CPM in point #4 of my post: 4 Facebook Ad Tips to Maximize Your Campaign.
Now all you need to do is click Place Order and your ad will be reviewed by the Ads team. Note that it can sometimes take up to 24 hours for approval of your ad, especially for new accounts – frustrating! So build that in to your marketing time.
Step 6: Review an Analyze
This is the most important part because this is how you will improve your costs in the long run. Watch which ads perform the best, see how much it costs you per page Like and test other variations to improve your performance!
So there you have it. Now I know there is much more to learn around Facebook Advertising so I will be providing more posts in the future about this subject. You can also see all my posts about Facebook Advertising by going here: www.andreavahl.com/facebook-advertising
If you haven’t already, just sign up below to get the free report and blog post updates so you don’t miss any of these juicy posts! And let me know how Facebook Ads have worked for you in the comments below!







Great timing Grandma Mary. Thank you for saving me time and money!
What’s funny is that the Get More Fans was extremely effective for me when it came out. Particularly if I deleted two of the ads and focused only on mobile. After that first campaign expired, though, I was never able to replicate those results.
Two of my favorite things, Kristy! Glad to help 🙂
That stupid button cost me $25/fan. That was ridiculous! I know it’s un-targeted but that was downright criminal. But I love those 2 fans I got dearly – my most expensive fans right there 🙂
If only I had known about the “Get More Fans” things before I wasted my money. My fans cost me $20/each. I’m hoping they’re the most loyal fans my page will ever see. I’ve definitely seen better return on the CPC campaigns.
Awesome – Loved the post.
BTW do you ever use the “broad categories”. I think thee is mobile all user which we should use. What do you think ?>
Perfect timing for this post.
Preparing for my first ad. Printed this tutorial out and will keep in my notebook. Thanks!!
I found a great way to get Cheap facebook advertising – its great not having to pay crazy money for clicks 🙂 CHEAPFACEBOOKADVERTISING.INFO