
Are you confused about how to implement the Facebook Ads Pixel? Wondering what the Facebook pixel actually does for you and how to use it in an ad? In this article you will learn how to install the pixel, two methods for tracking your conversions with the pixel, and how to view the cost per conversion in your Facebook Ad reports. **NOTE This article was updated on 9/2/2021
Important Concepts to Understand about the Pixel
First of all, what is a pixel? A pixel is just a bit of code (also known as a script) that you put on your website that sends messages back to Facebook for tracking purposes. Each Facebook ad account only has one pixel code initially. You can install this pixel on multiple websites and then you can track those sites separately. But you always use the same code that is associated with your ads account. You can create additional Facebook Pixels (up to 100) through the Business Manager, but often you only need the 1 pixel for your websites. The only reason you might want different pixels for different websites is if you have very different audiences that visit those sites.
The audiences and tracking starts after you install the code. So get the code installed as soon as possible if you want to target people who have visited your website. You can only share pixels through the Business Manager. Previously you used to be able to share website conversion pixels with other Facebook Ad accounts so that multiple people could track those conversions with an ad. But now if you want to share a pixel it needs to be done through the Business Manager. You have a MAXIMUM of 100 Custom Conversions that you can add to your account but you can delete them if you make a mistake. You can place the Standard Event codes on unlimited number of web pages so if you have lots of different conversions to track, you may want to focus on using the Standard Event codes (again, more on this later).
First Step: Install the Facebook Pixel
The first thing you need to do is to install the new pixel on your website. You can check the Partner Integrations area to see if your website has easy instructions on connecting the Pixel. If not, you can install the Pixel manually. First navigate to the Facebook Ads Manager and then follow these steps:
- Click the 3 lines (aka a hamburger menu) from the upper left corner and select Events Manager from the menu (you may have scroll down to see this option). Note that Facebook likes to change the navigation icon, so this could also be a grid of 9 dots.
![]()
- If you haven’t created the pixel before, you will be prompted to create it and name the pixel (the name will appear publicly with the Pixel Helper). Your screen may look a little different but there will be some type of “Get Started” or “Create Pixel” button. If you have created the Pixel before, you can skip to the next step.
![]()
**Note that sometimes you have already created a Pixel in your Business Manager, but you haven’t connected the Pixel to your Ads Account. If you know you have a Pixel that has been installed, check the Facebook Business Settings area to see if you need to connect it to your Ad Account.
![]()
Before you start installing the Pixel manually, check to see if there are instructions for your website platform in the Partner Integrations section Just do a search to see if your platform is supported.
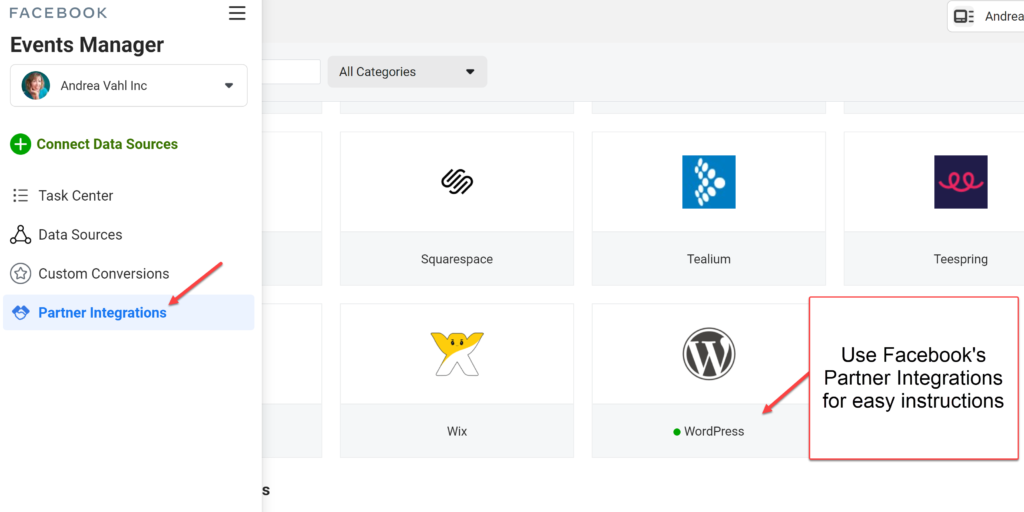
If there are, use those instructions. Otherwise, continue with the Manual method.
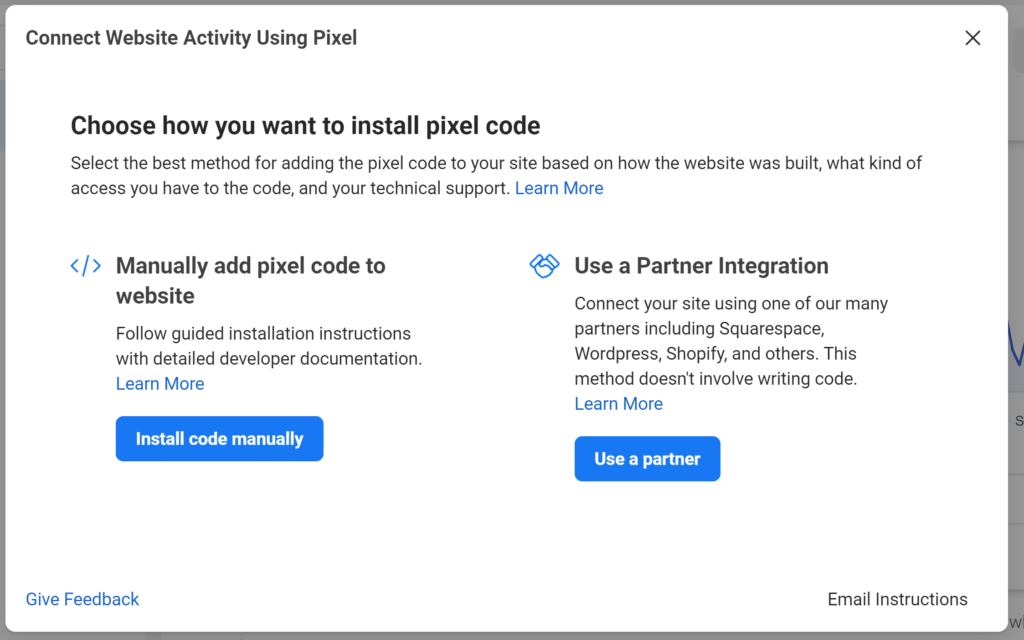
- If you are just starting you may automatically be directed to the popup box that has the Pixel code in it, or you may have to click the “Add Events” drop down menu and then select “From a New Website”
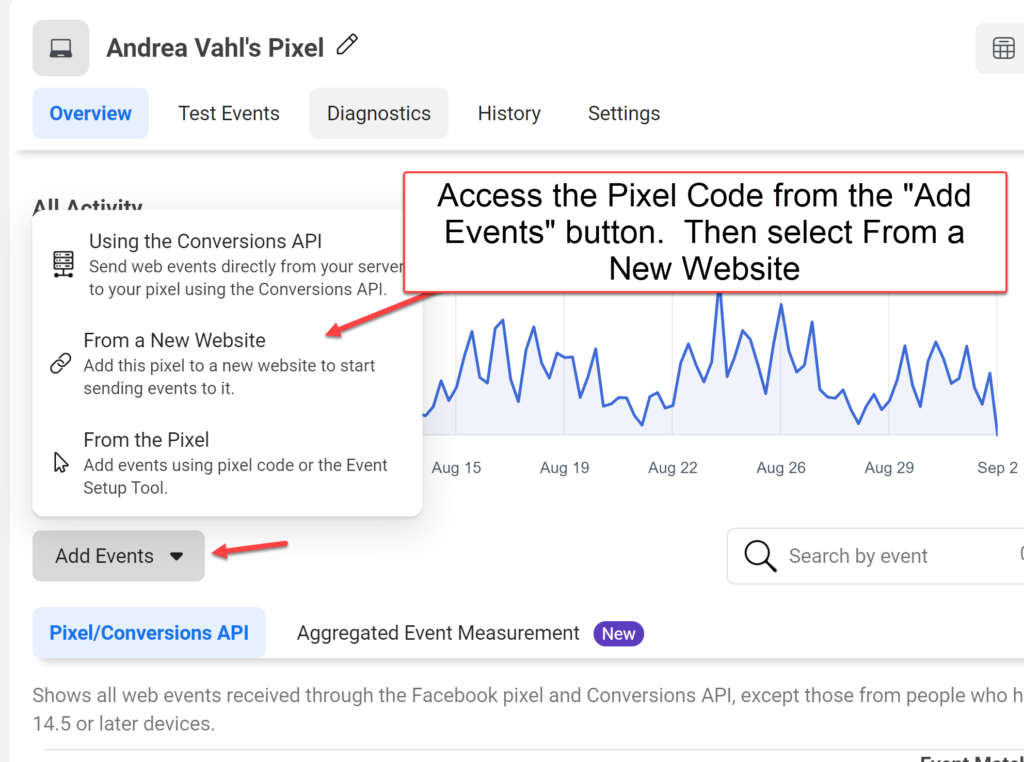
- A popup box appears with some choices and you can select Manually Install the Code Yourself. We’ll cover Partner Integrations next.
- Now you can copy the pixel code and Facebook has a nice walk through of what to do next.
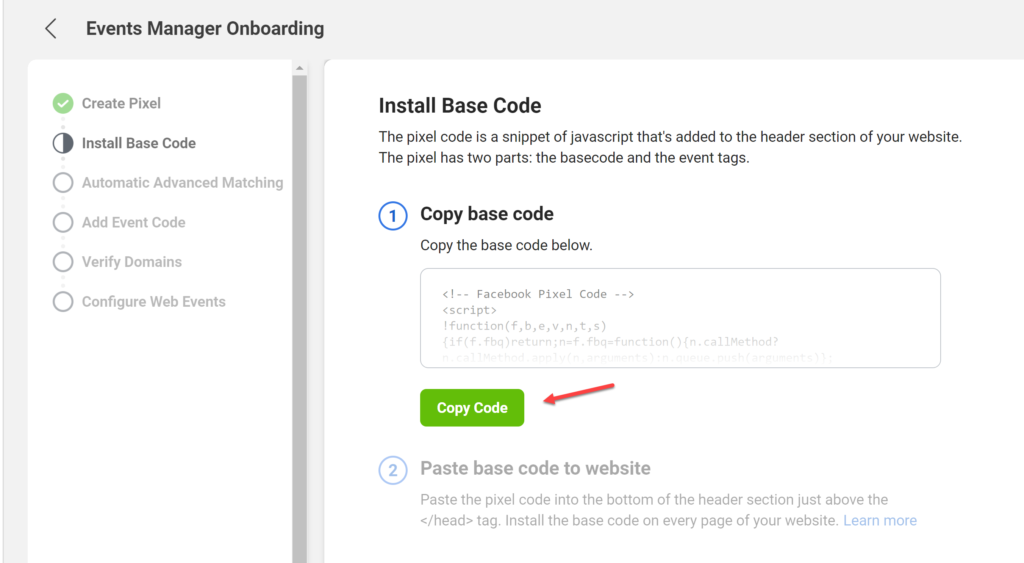
- Go to your website and paste the code in between the mainandarea. Some WordPress sites have themes that make this easier (a Header Script area). Get a webmaster to help you if you don’t know where to find this. If you are using a WordPress site, I would recommend either using the Partner Integration or the PixelYourSite WordPress plugin (which also makes Domain Verification easy). I would also turn on Automatic Advanced Matching.
You will know your code is working if you start to see some traffic recorded in the Total Traffic area after you have visited the site where the pixel was installed. Remember that you don’t have to be running Ads for the Pixel to be tracking the traffic. ![]()
If you are not showing any traffic, use the Facebook Pixel Helper Chrome extension to help you troubleshoot the problem.
NEW CHANGES with Domain Verification
Facebook is now requiring Domain Verification in order to track Conversions with the pixel. You can see exactly how to verify your Domain in this video from Facebook: https://developers.facebook.com/docs/sharing/domain-verification#action. You will also need to Prioritize your Events (explained below). I explain more about these changes in this post: Facebook Ads and Apple iOS 14 Changes: How to Prepare
Second Step: Use 1 of 2 Methods for Tracking Your Conversions
The next thing you need to do is to set up the way you will track your conversions. By conversions, I mean specific events that happen on your website such as someone opted in to your Newsletter or giveaway, someone purchased something from your website, or someone registered for an event or webinar. You will be tracking these things from specific Facebook Ads only. The pixel doesn’t track from individual Facebook Posts. But the benefit is that you will know exactly which ad is converting the best for you. To be able to track conversions you need to have four things in place:
- Your Facebook Pixel installed on your website (done in step 1)
- A “thank you” page that is on your website where someone lands after the event.
- The Domain (website) that you are sending traffic to has to be verified (an extra piece of code or verification method that claims ownership of that website).
- The Events (either standard events or custom conversions) need to be prioritized in the Web Event Configurations area in Facebook.
So, for example, if you have someone signing up for a webinar on with a webinar service like Go to Webinar, you need to redirect them to a page on your website after they have completed signing up where the pixel is installed. That way Facebook knows the action has been completed and it can attribute that registration to that exact ad. You can’t track Facebook ad conversions on other people’s website such as Amazon because that site is not under your control and you are not able to put the pixel on their site or do Domain Verification on their site. Facebook’s new pixel has two ways you can track conversions:
- Standard Events
- Custom Conversions
The Standard Event method involves adding an extra bit of code to the base code and you add the standard event code ONLY on the pages where you are tracking a specific event (i.e. a “thank you” page). I recommend using Standard Events with the new changes and MAXIMUM 8 Prioritized Events available. The Custom Conversion method doesn’t require any extra code added to the “thank you” pages, you just use a URL rule instead. But you are limited to creating 20 Custom Conversions. This method is ideal for people that don’t have many events to track and don’t want the added hassle of adding the standard event code to their website.
Using the Standard Event Method for Facebook Ad Tracking
This method is very easy to implement if you have easy access to the website. You can also add as many Standard Events to pages on your site for tracking (unlike the Custom Conversion method). On the events that you want to track such as a Purchase, Lead, Subscribe, etc. you will add the Standard event script to the page on your website AFTER the event happens (not the page people land on). That page will indicate that the event is complete and a conversion has happened. For example, if someone lands on a page on your website where they can buy shoes, that page will only contain the basic pixel code. Then on the thank you page after someone has purchased the shoes, the page will have the base pixel code AND the Purchase standard event script. Here is an example list of the Standard Event codes:
![]()
What you will do is add an extra line of code to the Facebook Pixel code such as:
fbq('track', 'Purchase', {currency: "USD", value: 30.00});
The Base pixel code includes the PageView standard event and then you would add another line of code just below that for something like AddToCart shown here:
![]()
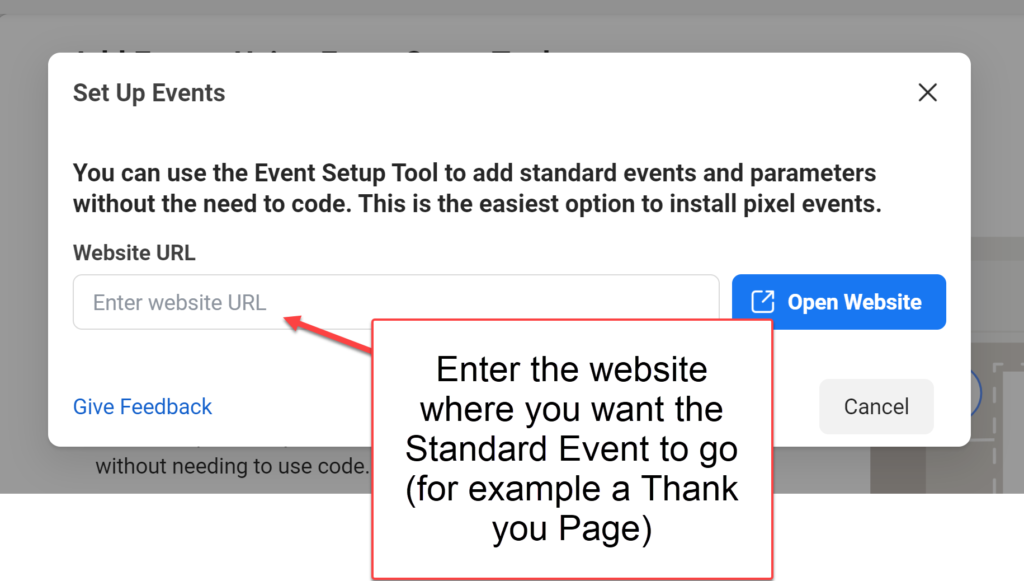
There are more details about the different standard event codes in the Facebook Developers section. Once you have installed the extra bit of code to your Pixel on that page, you are done with this step. If you have used a Partner Integration then it may be possible to use the Event Setup Tool in Facebook which is an easier way to add Standard Events.
Using the Custom Conversion Method for Facebook Ad Tracking
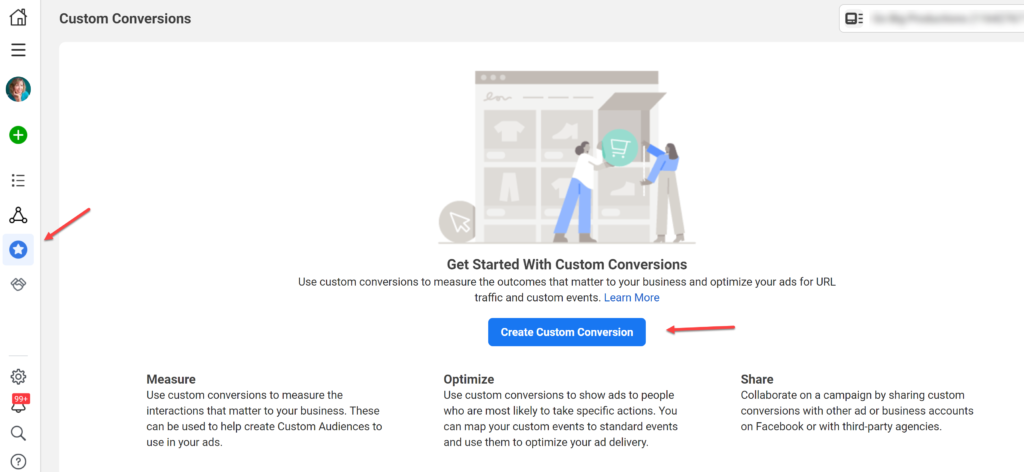
The other way to track Facebook conversions from an ad is to use a Custom Conversion. Custom conversions allow you to track and optimize for conversions without adding any extra code to your site. Although with the new 8 Priority Events rule, I don’t recommend using Custom Conversions unless you know you only have a few conversions you want to track. To create a custom conversion follow these steps from the Events Manager area of your Ads Manager:
- Mouse over the left navigation column and click the Custom Conversions selection (indicated with the blue circle with the start in the middle). You will then see the Custom Conversions you’ve already created or you will be able to start one from scratch.
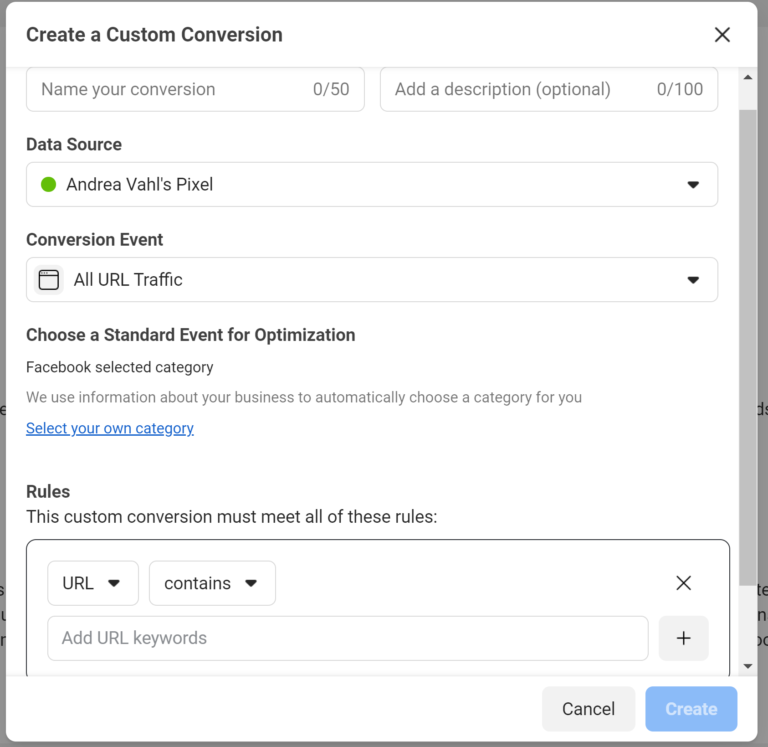
- Add the URL rule you want to track. So if you are matching a particular page exactly, you enter that web address and use URL equals (make sure you include the www or http:// as needed). If you want to track across several types of pages you could use the URL contains /thankyou as an example if you had several ‘thank you’ pages that had that phrase in them.
Now you will be able to use the Custom Conversion in ads and you will also see the traffic to the pages specified in those custom URL Rules on your Custom Conversions page.
Third Step: Prioritizing Your Events
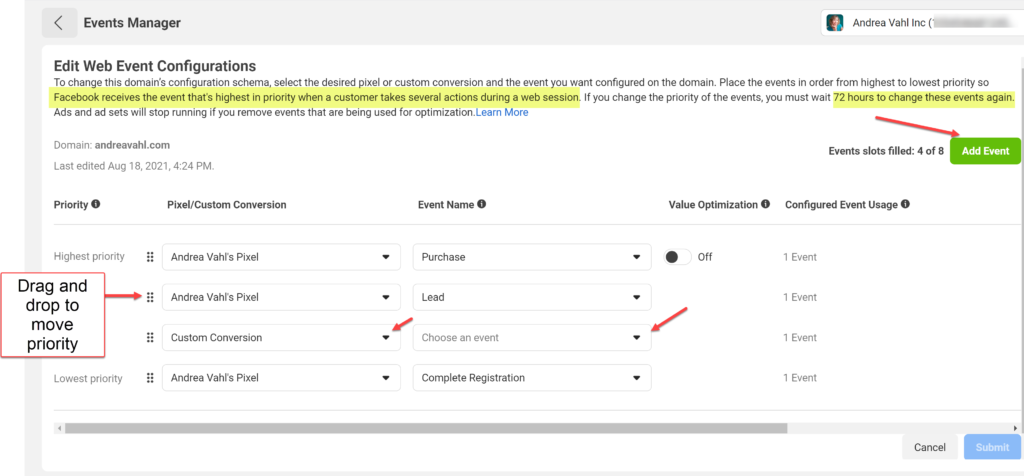
Before you Prioritize your events, make sure you have verified your Domain as discussed in Step 1. I have detailed instructions on both Domain Verification and Event Priority on this post: Facebook Ads and Apple iOS 14 Changes: How to Prepare You can access your Web Events from the Aggregated Event Management tab in your Events Manager, then select Configure Web Events.
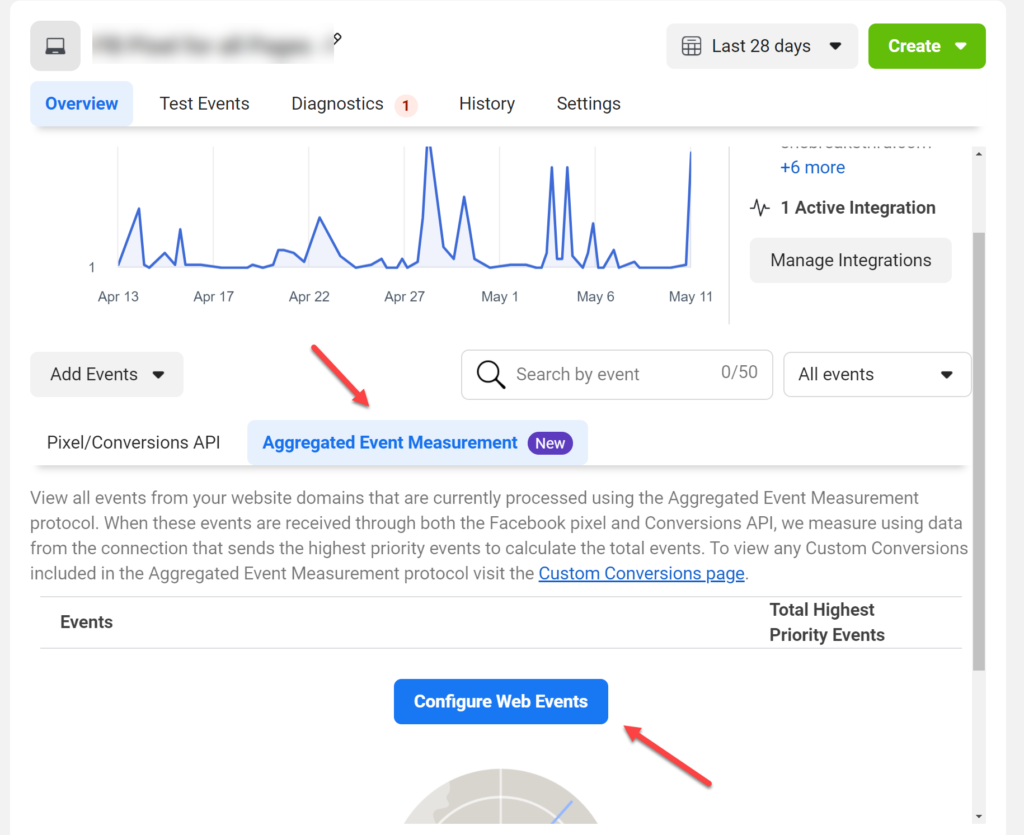
Once there you can select Add Events to ad either Standard Events or Custom Conversions. Drag and Drop the events to reorder them. Place the events in order from highest to lowest priority so Facebook receives the event that’s highest in priority when a customer takes several actions during a web session. So typically I will have the Purchase event as the highest priority because that’s the one I want to make sure Facebook is counting.
Fourth Step: Creating a Website Conversion Ad
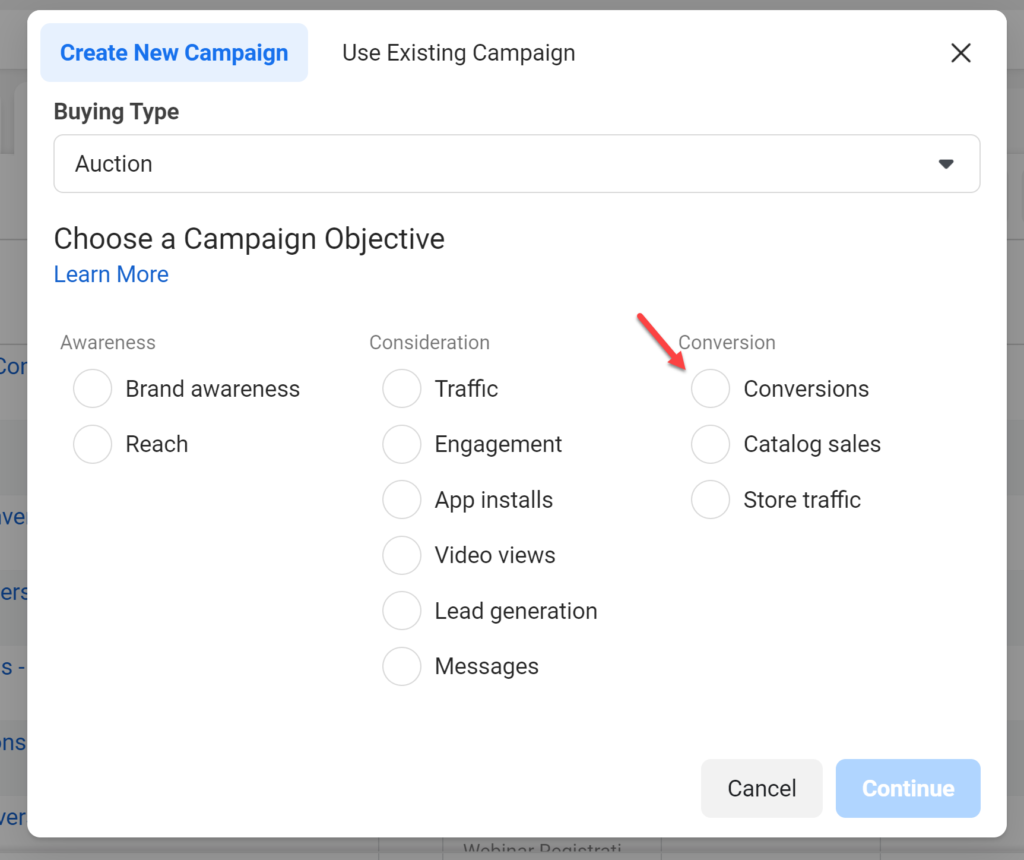
Now that you have your conversion method defined and your pixel installed, you are ready to track your conversions! Going step-by-step on every aspect of creating an ad is a little beyond the scope for this one post, but I will share the spot you need to watch for so that you can optimize your ad around the correct conversion. When you are in the Facebook Ads Manager area, click the green Create button to get started. Then follow these steps:
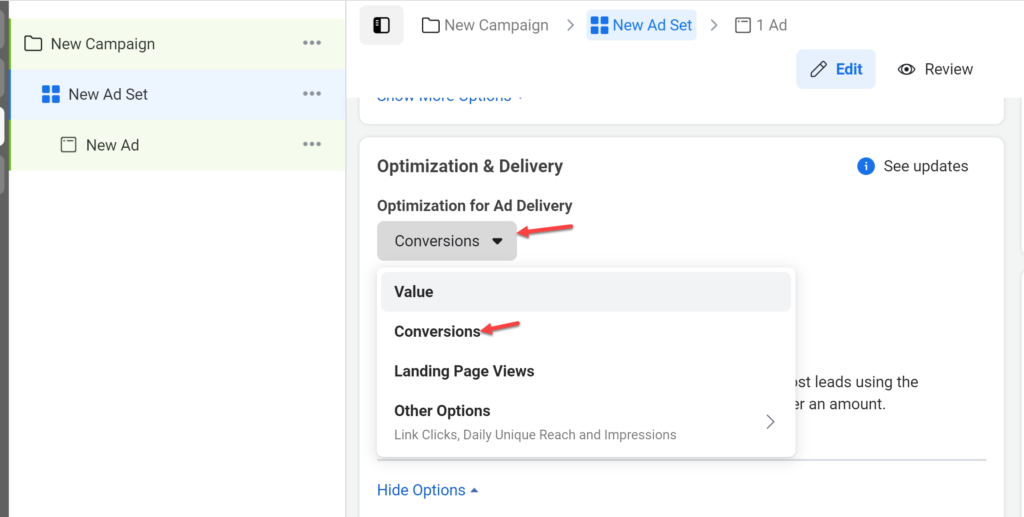
1. Choose Conversions for your objective.
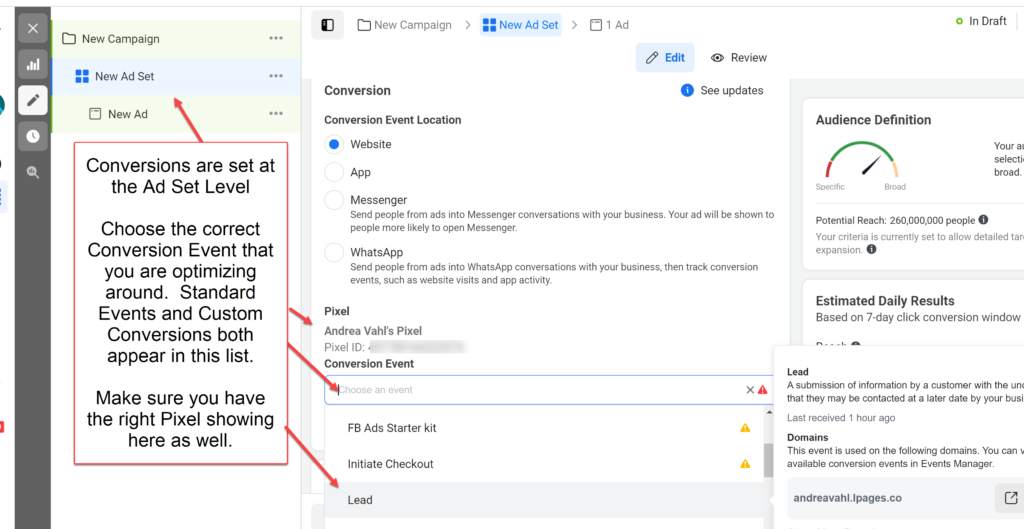
2. You will select the Conversion Event at the Ad Set Level. Part of the confusing thing is that all the different conversion tracking is listed together. But they doesn’t appear until you have set them up. Your Custom Conversions will appear first and the Standard Events are further down the list. IF YOU HAVEN’T SET UP THE STANDARD EVENT BY ADDING THE CODE TO YOUR WEBSITE, DON’T SELECT THAT OPTION.
3. From here, you set up your Facebook ad exactly the same way you have done it in the past by selecting your targeting in your Ad Set, and setting up the creative part of your ad (image and text) at the Ad level. 4. Once you are done configuring your Ad Set and Ad the way you want it, select Publish to start your ad running. One thing to note is that your ad will automatically be set up to optimize for Conversions at the Ad Set level. You can change that bidding method but your conversions will still be tracked. I would keep Conversions as the optimization.
Fifth Step: Viewing the Conversions and Cost per Conversion in Facebook Ad Reports
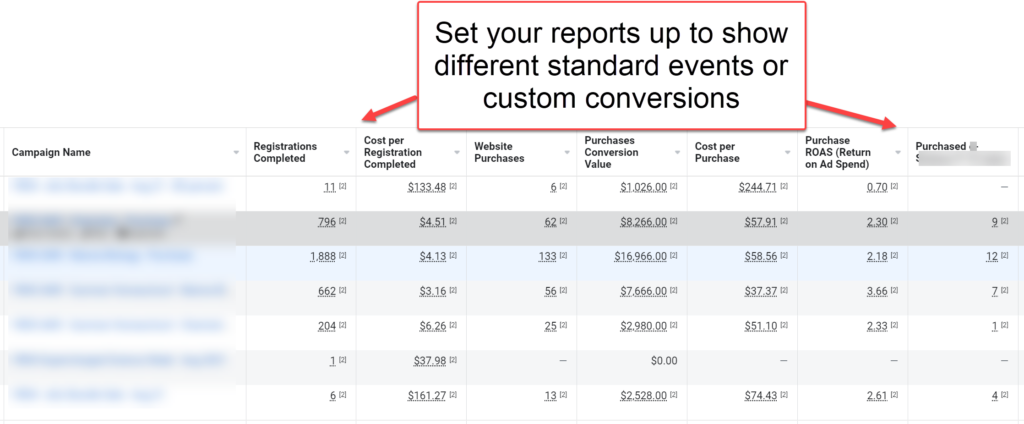
After your ad has been approved and has started running, the last step is to view the Facebook Ad reports correctly so that you know when your ads are registering a conversion and how much each conversion costs you. You can set the reports up to show you different Standard Events that might be happening along the funnel (add to cart then purchase for example) or also any Custom Conversions.
 **With the new iOS changes and people opting out of tracking, Facebook is not going to track ALL your pixel events. So your reports in Facebook won’t be exact. Facebook does sometimes get the columns right in the Ads Manager area according to what you are advertising but the best way to make sure you are looking at the right stats is to customize your columns. Go to the Column area and select Customize Columns from the drop-down menu.
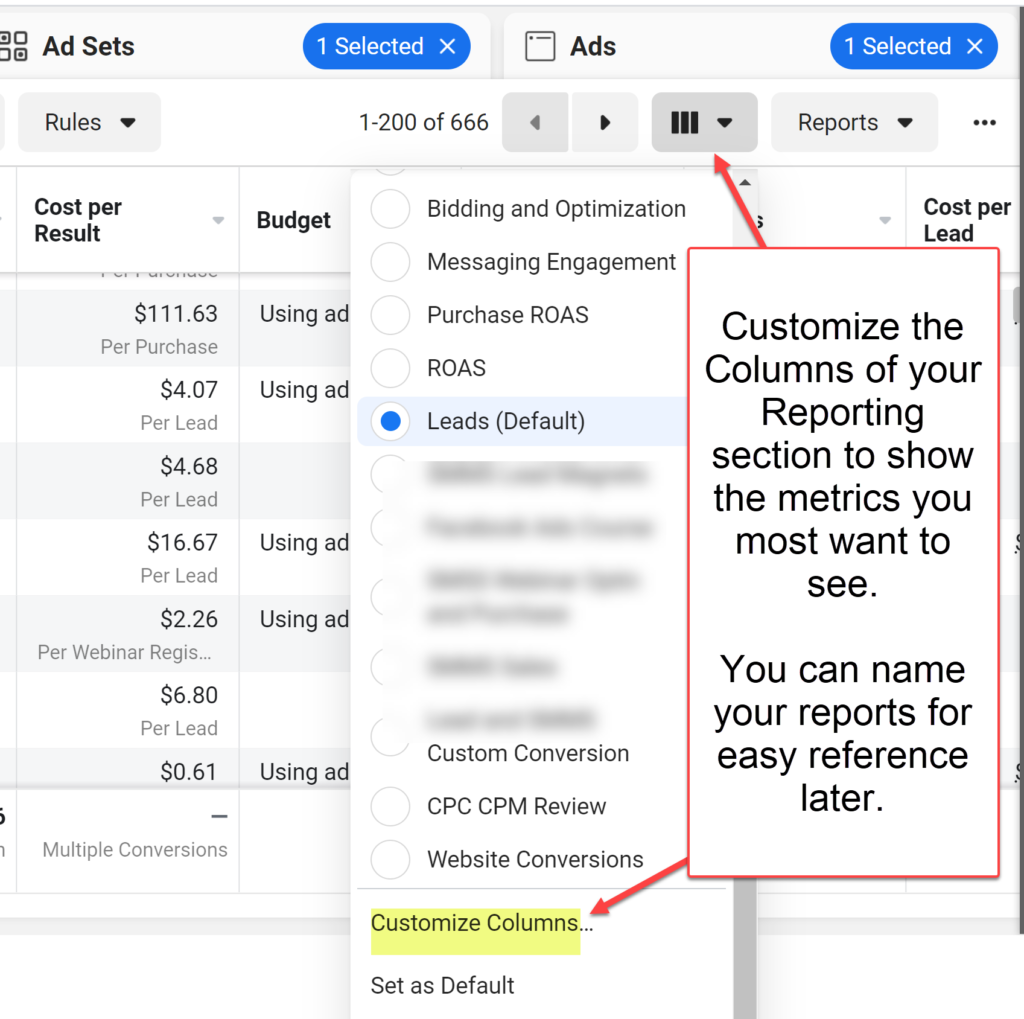
Now you will see a pop-up box with all the different stats you can select. Select the stats you want to see and then most importantly, scroll down to the Websites section in the center column (or select Websites on the left column to jump there).
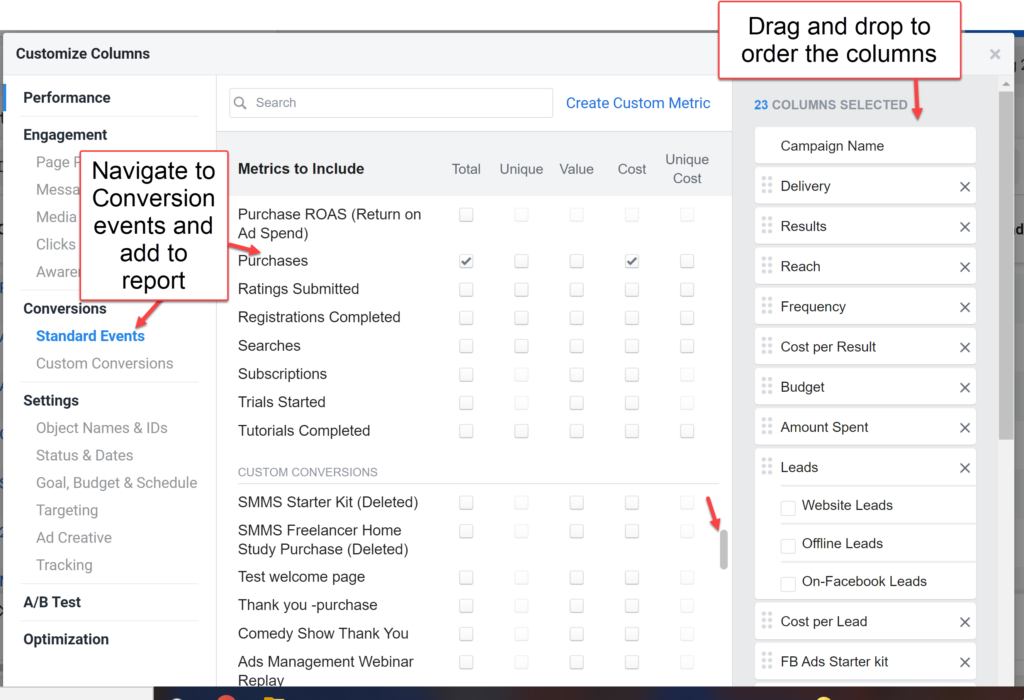
Make sure you select the Cost column so that you see how much each conversion cost you from each ad. If you have added a conversion value or purchase price in your Pixel code then selecting the Value column will allow you to see the Return on Ad Spend. Now you will be able to make the right choices on which ad is converting at the best price for you. Once you are done selecting your columns, click Apply in the lower right corner and your report will appear with the right columns. For easier viewing in the future, save your report by selecting Save next to the custom configuration you just created (and you can make it the default view after you save it).

So there you have it! Once you have gone through this process once, you should be able to skip right to Step 4 and only do Step 4 for any new ads unless you have a new conversion or standard event that hasn’t been created or prioritized before. When you track conversions from your Facebook ads, you are going to see a much clearer benefit to using ads for leads and sales. You can also improve your ad strategy to decrease your cost per conversions by split testing your ads and optimizing your budget to focus on the ads that are actually working for you. How about you? Have you installed the Facebook Pixel yet? What is your experience with using Facebook ads to drive conversions?
Share your thoughts with us in the comments below!


thanks! great info
Glad you liked it Deborah!
Well what can I say? Facebook pixel is perfect for tracking all the traffic and conversion rates for your Facebook Adverts.
This post gives great insight on how people can market their content using Facebook. There may be a lot of people who are not of aware of Facebook pixel, this is perfect for marketers to use in their Facebook Ad campaigns.
Great post!
Benjamin
Glad you enjoyed it Benjamin!
Hi Andrea,
Thanks for this timely article. If we’re an agency running ad campaigns for multiple clients do you recommend using Business Manager?
Is there an alternative way to do it?
I would definitely recommend Business Manager for agencies because then multiple people can work on the campaigns without the hassle of adding them individually to the client’s Ads manager if that’s how you do it. But it is a little safer all around. I have a post on the Business Manager here: https://www.andreavahl.com/facebook/facebook-business-manager-explained.php The only downside is that the client will have to convert to Business Manager also to share their Ads Account with you.
Thanks so much Andrea, this is helpful.
great post, how can i delete a facebppk pixel?
So you can’t delete a pixel that is associated with your account. You can remove it from your website (just delete it from the place you put it)
Hi Andrea,
Great Post. I’m currently running campaigns via Facebook ads account and planning to run lead generation campaigns from the same account for 2 different domains (e.g.; abc.com & xyz.com). Does using the same pixel on both these domains will have issues in terms of attributing leads to the right campaign. How will facebook differentiate between these 2 domains if the pixel is same.
It will track them separately just like if you have two ads running to the same landing page. It will also track those separately as well – Facebook knows the conversion came from that particular ad. Just make sure you have your standard event code on the thank you pages so you know when the conversion happened.
When setting up an ad in FB to track conversions, do you select the base code pixel or the tracking code? eg complete regsitraion?
What you do is use the whole Pixel code – the base code to track any Page Views on your site (so that would be for traffic and website retargeting) and add that into the area of your whole site. But then for ONLY the thank you page after they have completed the registration, you use the whole base Pixel code again but substitute the “Complete Registration” line where the “Page View” line is in that code. Hope that helps!
Hi, if i’m right, its better to set up two different pixel id’s from two separate ad accounts with different domains. My FB account manager told this and see also this Facebook help team answer: https://www.facebook.com/business/help/community/question/?id=258137181196700. Does anyone have experience with conversion tracking on multiple domains?
Hi, if i’m right, its better to set up two different pixel id’s from two separate ad accounts with different domains. My FB account manager told this and see also this Facebook help team answer: https://www.facebook.com/business/help/community/question/?id=258137181196700. Do you Andrea or anyone have experience with conversion tracking on multiple domains? We have still to change from the old conversion pixel to the new one for over 120 clients as agency…
So I have tracked ads with the same pixel across multiple domains. As an Agency, you should be using the pixel from the client’s account and you can request access to their pixel through the Business Manager.
Thanks, Offcours, I know how to get access and set up a new pixel on clients ad accounts. So it’s possible, you tracked it but do you think Facebook is able to optimize the best way a campaign for (example) the ‘Purchase’ event with the same pixel id is placed on 2 differtent domains? I don’t think so….
Hello,
What if I need to add the pixel to various domains? Do I simply add the new Facebook Ads Pixel to these domains and that’s it? Won’t the data from one domain overlap with the data from a different domain?
Yes you can add the pixel to multiple domains and then just create different audiences for each separate domain. So now you’ll be able to target only the visitors of the individual domains. Hope that helps!
How about when I need the pixel to track my conversions? Meaning I have created 2 campaigns each one for a separate domain. I have installed the Facebook pixel on each one of the domains . The landing page on both of those domains have a lead form that collects leads from customers, so I added the ” Lead” as a standard event on both of the domains. Now when I create a campaign and set my objective as “Increase conversions on your website”, I am asked to “Choose the conversion you want to optimize your ad for” What am I supposed to choose there?
So the way the tracking works is the Lead Standard event is on the Thank You Page of that particular website. The ad will send traffic to the optin page on that website and only track when the Lead Pixel fires from that particular ad. So they aren’t going to “cross pollinate” unless for some reason someone then finds the other website after clicking on the ad and opts in there too. A Custom Conversion could be the way to go if there are possibilities of cross pollination. Hope that helps!
Very profound post Andrea, thanks 🙂
My question is that, I have landing page for optin and I use lead generation as well using snaptiks.com to syndicate audience to mailchimp. I am using the same thank you page for both of them and want to segregate the traffic, what is the best way to that? should I use separate page, should I use url parameters.
thank you
So I’m not sure what you mean by “segregating” the traffic – do you mean for tracking? Or are you trying to re-target? If you are tracking, just use two different Google UTM codes if you use Google Analytics. This post can help: https://www.andreavahl.com/social-media/3-keys-to-measuring-social-media-roi.php
If you mean for re-targeting, then you would have to use two different thank you pages and build two different custom audiences in Facebook. Hope that helps!
Hi Andrea, the new Facebook pixel is really a must have to track custom audiences, create better retargeting campaigns and improve Facebook Ad conversions! Since it can be tricky and time consuming to set up, at LeadsBridge we developed a free tool to help marketers easily manage the pixel and automatically fire standard events with just a line of code. You can try it out here: http://leadsbridge.io/lb-facebookpixel
Hope it can be helpful to make all the techy stuff easier 🙂
I am trying to manage different client websites within my Business Manager account so am using the same Facebook pixel across all the sites. You say “create different audiences for each separate domain” so does that simply mean selecting ‘Custom Combination’ and then specifying only traffic that meets certain conditions (i.e. URL contains…). Is that how I would create separate audiences for my separate clients based on traffic to their websites?
Yes you would go into the Audiences section, create a URL rule that says anyone in this audience would have visited the URL Contains (and then the base website address for your client). Now when you choose the targeting, you will select the Custom audience for that client. Hope that makes sense. The other way to do it is to be an Ads Manager of your Client’s ads account and use their Pixel.
Hi Andrea, thanks for the help!
But I have a question and I’ll try to phrase it as simple as understandable as possible 🙂
So I installed pixel and I created and I have 3 events. And I use these pixels for different ads. One of my event is Successful Registration. Will it be possible to track how many conversions I got from that event per ad / ad set that I created? I know my question is quite vague, but I hope you get me haha.
Sorry, but I still just don’t get it. Perhaps the problem is that the typical scenarios simply do not apply to my business model. If my company is one that creates eCommerce websites and I have 50 different websites, what is the solution to placing a pixel on those 50 completely different websites, selling 50 completely different types of things?
None of these business entities would have their own ad accounts. They are all under the same main company and the same parent Facebook page. They only allow a maximum of two ad accounts for any single entity, so 50 different pixels is entirely impossible. With a limitation of only 20 different conversion events, how on earth would you keep these 50 sites separate and have any sort of reliable reports and tracking information?
Why would any company EVER have restrictions on the number of ad accounts any single entity could have? Like I said, maybe I just don’t get it, or maybe, Facebook has severely limited its possibilities for additional ad revenue for reasons that are not clearly apparent. This is what happens when you have computer geeks running a company instead of real business people – a problem that Google suffers from, too.
Good post. Most of the people get confuse with events and conversions. This article is well explained the difference between the two. Even I wrote something similar on Facebook: http://www.semupdates.com/social-media/
Hi,
Great post.
Here is my concern, I have created the Facebook ad account but still payment method is to be added. Meanwhile, I have added Facebook pixel and a Lead event code on my website. Facebook pixel is activated and showing a GREEN indicator and I can track it as well. But, I am unable to track lead event. Although I cross checked the lead event code, it is perfectly alright. Is this a payment method problem? I mean to say that is it necessary to add payment method first and after that I can track the Facebook events? Please help me.
Awaiting your reply.
Regards,
Prashant