
Would you like to target your Facebook Ads to people who have already visited your website? This tactic can be EXTREMELY powerful to reach an audience that is already familiar with you.
This is typically known as Website Retargeting and uses a Facebook feature called Website Custom Audiences. If you’ve ever noticed those ads that follow you around the internet after you visit a website (sometimes spoiling your surprise Christmas gift for a spouse as I have first-hand knowledge), setting up a Website Custom Audience will allow you to do the same thing with your Facebook Ads.
Website Custom Audiences uses a Pixel code to track visitors to your website. The Facebook IDs of the visitors are stored in the Custom Audience for a period of time (that you specify) and you can direct ads just to them.
The audience starts building the moment you add the pixel code to your site, not before. So make sure you add the Pixel well before you actually need to use it.
The pixel code is the same for every Website Custom Audience you create. You only need to add one Custom Audience pixel to your entire website regardless of the number of audiences you create.
Here is an outline of the basic steps:
- Create the Website Custom Audience in your Facebook Ads Manager or Power Editor.
- Place Website Custom Audience Pixel on your website (between main <head> tag or on every page). This step only needs to be done once.
- Specify which specific URLs you are gathering traffic from.
Let’s dive into each step.
Step 1 – Create the Website Custom Audience
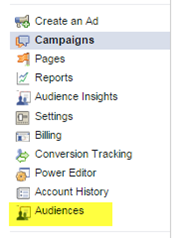
First go to your Facebook Ads Manager and select Audiences from the left sidebar.
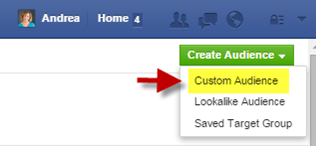
Next select Create Audience in the upper left corner and select Custom Audience from the drop-down menu.
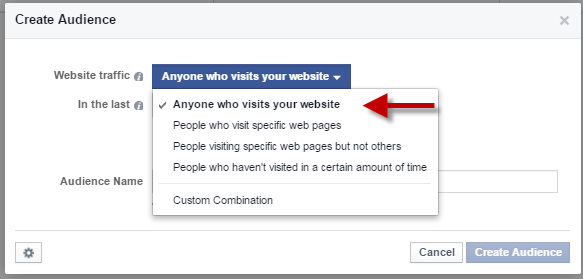
Now select Website Traffic from the popup box.

You’ll see another popup box where you select where you want to capture the traffic, the date range you want to set, and the name of the Audience. The default setting is Anyone who visits your website and you should start there.
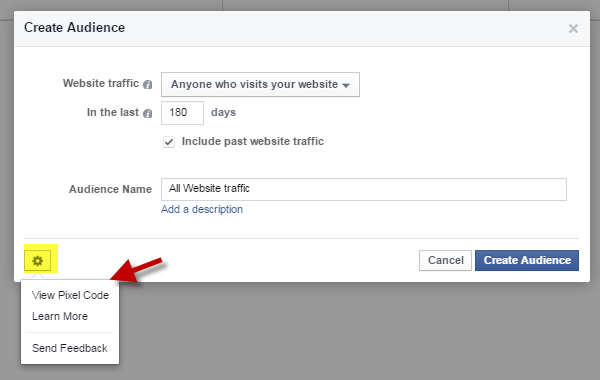
Name set the date range to 180 Days which is the maximum and you can title your Audience name something more descriptive if you are going to use multiple Custom Audiences so that you know what each one is about.
2. Place Website Custom Audience Pixel on your website
You see in the image above when you create the audience, there is a place to View the Pixel Code. That code needs to be placed on your website before the audience can start building.
Select the wheel icon as shown and click View Pixel Code.
![]()
Now you are going to copy and paste this code into your website between the <head> tags or in an area for scripts in your WordPress site if you have that available in your theme. This step only needs to be done once. After that, every time you create a Website Custom Audience, it will be using that particular Pixel and you might just change the information the audience is gathering.
If you aren’t sure how to get this code into the header area, you can place it individually on pages you particularly want to track.
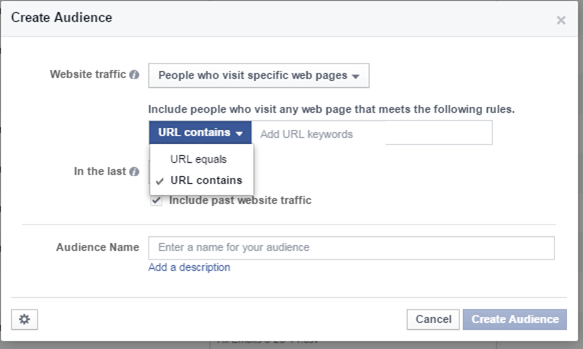
3. Specify which specific URLs you are gathering traffic from.
We essentially did this in step 1 initially but I wanted to make sure you knew you could also gather traffic from specific pages on your site with the same pixel.
You can do things like advertise to people who visited a particular sales page, or any traffic that has a specific term in the URL such as a category on your site.
Want to go further with Facebook Ads? Take my Facebook Advertising Secrets Course!


Andrea, what a good job in explain it. My question if you have time to answer: How much FB charge for showing my visitors ads. Is it per view, per click or some other method.
Good morning Andrea thank you for a very informative article on how to set up website retargeting in facebook. I love how you have provided this step by step information and it is really easy to follow. I guess placing the code on your site could be a little challenging for some who are not familiar with html coding. I have also shared this article on my social media platforms. Kind regards Kim
Hi Andrea,
I’d love to try this, but I have not been able to work out how to get a pixel code on my Weebly web site. Is there a way to do that?
It really depends on how you do your bidding – you can bid on a cost per click basis or a cost per 1000 impressions basis. Hope that helps!
Thanks Kim!
I’m not super familiar with Weebly but I found a way to add Google Analytics code to Weebly and it should be the same process – just put the Facebook code in the same place: http://www.stepbysteppresentations.com/google-analytics-with-weebly.html Hope that helps!
Does the retargeting ad show up in the newsfeed as do the regular FB ads? In other words, this is just another way of defining the target who will see your ad?
When
I read about what fortunes people and celebrities spend on Designer Handbags, I
am even more happier that Replica Handbags
exist. Not only
Replica Hermes handbags but very good quality
Replica GUCCI handbags, at
very affordable prices. I for one have probably more than 100 fake bags and for
sure I didn’t spend fortunes on them. I am a very good business woman and I am
writing this blog to help you guys out and to help you make the right
decisions, because we shouldn’t spend fortunes to look good and feel good,
right ladies?