
Would you like more precise control of your Facebook ads?
Want access to advanced Facebook features not available in the Facebook Ads Manager?
Power Editor offers advanced features that can help you reach your perfect audience with the right message.
In this article I’ll outline some of the benefits of using Power Editor and how to navigate it to create and edit campaigns.
What Is Power Editor?
Power Editor is a bulk ads creation and management tool typically used by larger Facebook advertisers or advertisers who want advanced features.
Power Editor is essentially a plugin that works with Google Chrome. It works on a download and upload system, so every time you want to work in Power Editor you download all of your data from the Ads Manager and then create your campaigns, ads and ad sets within Power Editor. Then you click Upload Changes to actually start running your ads.
Your ads will then be available to view from the Ads Manager. If you need to make any changes to features that are only available in Power Editor, you will have to re-download your ads, make your changes and upload them again. However, if the change is something you can adjust from the Ads Manager, feel free to adjust it there.
Benefits of Using Power Editor
Power Editor has a lot of interesting features. One benefit is that typically new features are added here first before they roll out to the Ads Manager area, so you have early access to all of the coolest toys.
Here are some of the other benefits of setting up your ads with Power Editor.
Run Ads on a Time Zone–Independent Schedule
If you know your audience is only on Facebook at certain times of day, you can improve your ad performance by showing your ads at those local times.
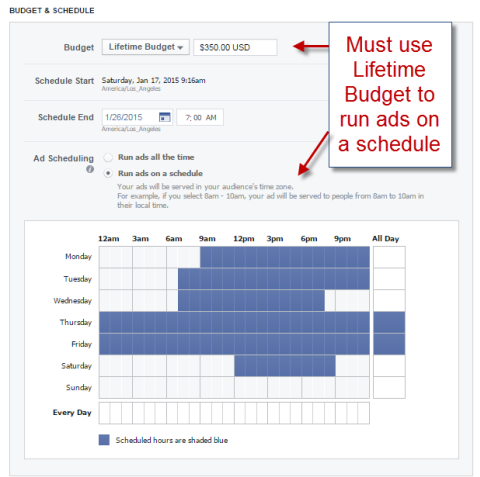
When you’re choosing your budget and schedule in the Ad Set area, you can pick exactly which times you want your ad to run in any time zone.
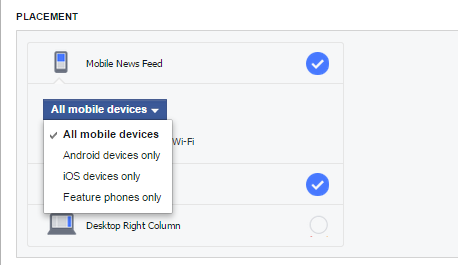
Controlled Placement of Your Ad
If you’re an app developer, controlling the placement of your ads can be very useful because you can advertise to the people on the right mobile device. You can also choose to only show your ad to mobile devices when they’re connected to WiFi.
Better Optimization
In Power Editor you can optimize your ad for the same things available in the Ads Manager such as clicks, post engagement (depending on whether you’re doing a boosted post ad) or impressions.
But you can also select daily unique reach, which allows you to bid on impressions (bid per 1,000 people who see your ad), but limits their views to once per day.
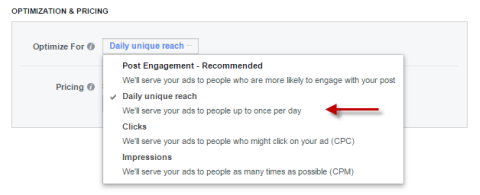
If you use the daily unique reach option, do your testing just like any other feature to see if it works for you.
Bulk Uploading
If you’re running a lot of ads, you may be interested in the bulk uploading feature. It allows you to upload an Excel spreadsheet of your ads and download them too, if you need to edit them.
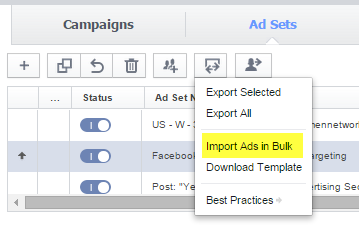
Start with the template and then check with Facebook Help to understand all of the columns.
Run Unpublished Posts
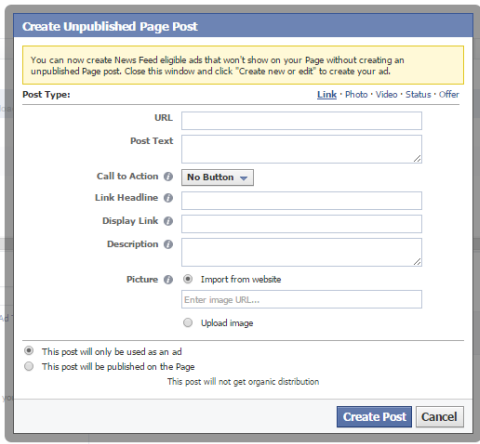
One of my favorite reasons to use Power Editor is the Unpublished Post option. An unpublished post looks similar to a regular page post in that it has longer text, but it also includes a call-to-action button and you can control what the link looks like.
I recently did a short tutorial on how to create an unpublished post in Power Editor:
Unpublished posts are great because you can split test your ads without posting multiple times on a page. That means you’re not posting too much promotional content for your fans. Plus, you have a call-to-action button that draws attention to your desired action.
Using an unpublished post can be a good idea because you can have longer text in the post to tell people more about your offer.
Keep in mind that the ad is optimized for page post engagement by default, so some people are going to be more likely to just click like or comment on your ad rather than visit your website. You can always change your optimization to clicks and see how that works by comparison.
Multi-Product Ads
This is the newest feature of Facebook’s Power Editor and you can learn more about how you set that up here: https://www.facebook.com/business/a/online-sales/multi-product-ads
Navigate Power Editor
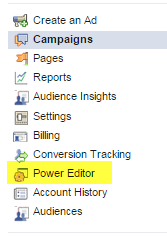
Now that you know a little bit about Power Editor, the next step is to access it. You can do that one of two ways: You can go there directly at https://www.facebook.com/ads/manage/powereditor, or you can go to the Ads Manager and select Power Editor from the left sidebar.
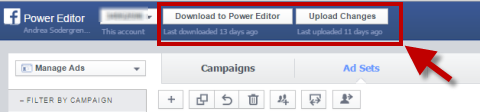
Typically the first time you use Power Editor, you’ll be prompted to download your data, but it’s a good practice to start your session by selecting the Download to Power Editor button at the top of the screen.
Once you are in Power Editor, you have a different navigation process.
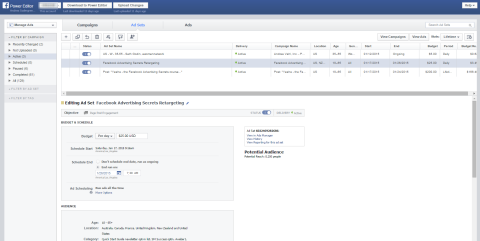
First you see the left sidebar where you can filter by campaign, ad set or tag. This can help you easily search for individual ads if you have a lot.
At the top of the page, just click on Campaigns, Ad Sets or Ads to see your ads listed. The text in blue indicates the active selection. In this example I chose Ads and you can see the three ads I’m currently running.
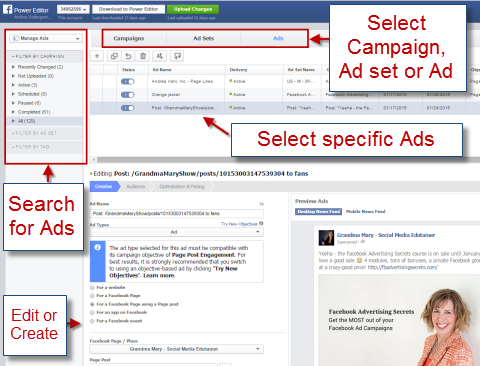
The buttons at the top of the page also have options for what you can do within each section. For example, you can split audiences of an ad set if you want to break down your ad for testing purposes.

This is also where you delete campaigns, ad sets or ads. Simply highlight what you want to delete and click the garbage can icon.
Another cool thing you can do from here is easily duplicate campaigns, ad sets or ads by clicking on the icon that looks like two boxes together.
Create a Campaign
Remember that a Facebook ad consists of three elements: campaign, ad set and ad. The campaign is where you set the objective of the ad such as page post engagement or website clicks. The ad set is where you select the targeting, budget and schedule for the ad. And the ad is where you have the image and text for your ad.
At first glance these things seem a little disconnected in Power Editor (at least that was my feeling), but you can see which ad set and campaign each ad is part of in the chart.
Here are the instructions for creating an ad in Power Editor.
Name the Campaign, Ad Set and Ad
My favorite way to quickly create an ad is from the Ads area (Ads is highlighted in blue). But make sure you go back into the Ad Set area and edit your targeting and budgeting.
Click the + symbol on the left side of the page to create a new ad.

A Create Ad pop-up box appears asking you to add the campaign and ad set.
If you’re using an existing campaign or ad set, make sure they have the goal (Campaign area) and targeting/budget (Ad Set area) that you intend. Otherwise, create a new campaign and ad set.
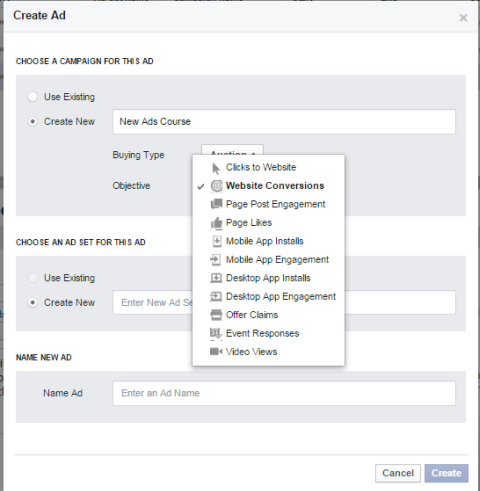
If you create a new campaign, you have similar options as in the Ads Manager. Here you can also set the buying type to Auction or Fixed Price. Auction is a better way to go since you’ll probably get a cheaper click price than what you bid.
If you’re creating a new ad set, you just need to make sure you adjust the targeting and bidding in the Ad Set area. Name your ad set something meaningful that relates to the type of targeting you’re doing or what you’re testing so that the reports are clearer. Once you have the campaign, ad set and ad named or selected,click Create.
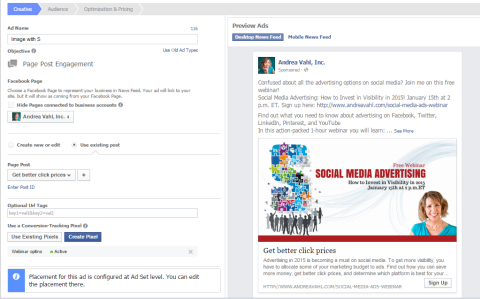
Design Your Ad
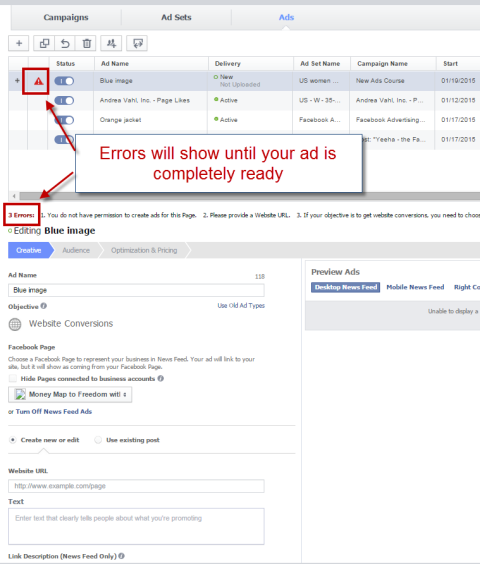
Now you’re in the Design area for the ad. The Design area will look different depending on what objective you chose for the campaign.
Note that you’ll see errors listed until you’ve completed everything you need to do before you upload your ad.
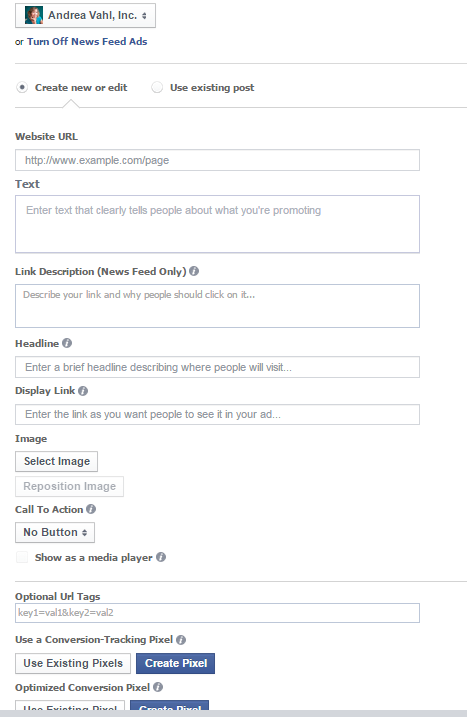
To get started, choose the Facebook page associated with the ad.
Below that, you see all of the creative sections to complete such as text, link description, headline, image, etc.
Once you have the ad in the Preview area and it looks good, you can move on to editing the ad set.
Just a quick note about previewing an unpublished post: You can’t edit the text after you have the ad in the Preview window—you have to delete the ad and start over. For the other types of ads, you can edit the text.
Edit the Ad Set
When you edit your ad set, you specify:
- Budget and schedule for the ad
- Bidding for the ad (optimization and pricing)
- Target audience
- Ad placement
Note that any ad under the ad set will use these parameters. If you want the ad to test different options, you’ll have to create a new ad set.
To edit the ad set, click on Ad Sets at the top and select the ad set name that you set up earlier.
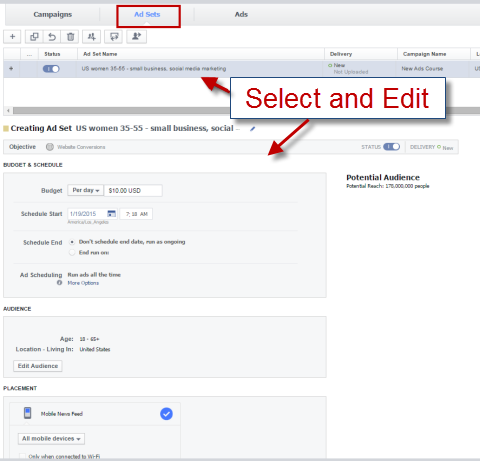
I talked about custom scheduling earlier, but you can also just set a daily budget with a start and end date or use the lifetime budget just like the Ads Manager.
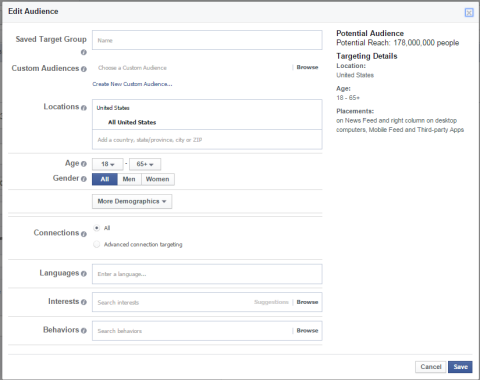
When you select Edit Audience, a pop-up appears where you can use the same types of targeting available in the Ads Manager.
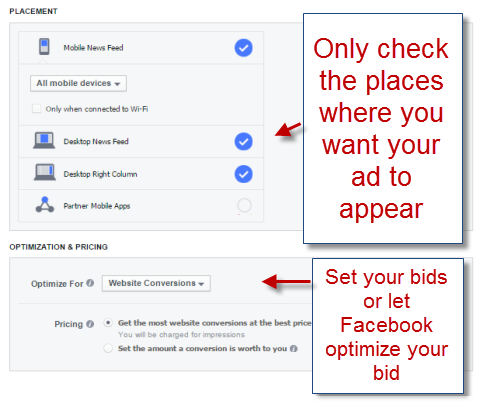
Set your placement and optimization and pricing in the next section of the Ad Set area.
Upload Your Campaign, Ad Set and Ad
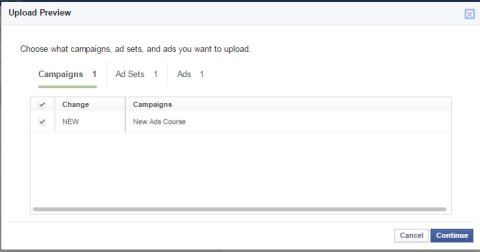
Now your campaign, ad set and ad are complete and you can click the green Upload Changes button to send your ad in for review.
If the ad passes Facebook’s review, you’ll get a notification that your ad has been approved and it will either begin running right away or be set to run according to the schedule you configured. When you click Upload Changes, you’ll get an upload preview to make sure you know exactly what’s being sent to the Ads Manager. You’ll receive an upload confirmation notification as well.
Access Your Power Editor Ads
Power Editor is used only in the creation or editing phase of your ads. Once you’ve uploaded the Power Editor ads, you can access them and make changes to them from the Ads Manager. You also access the report information from the Ads Manager area.
A quick caveat
As much as I love Power Editor, I am a big proponent of using the Ads Manager for most campaigns, especially if you’re new to Facebook advertising.
Several features that were once only available in Power Editor are now available in the Ads Manager. For example, the Ads Manager now gives you access to advanced tactics like custom audiences, lookalike audiences, website retargeting and conversion pixels.
Additionally, both Power Editor and Ads Manager have target audiences (which let you save a demographic and interests target to easily use it in multiple ads), as well as partner categories (which let you target things like homeowners, online shoppers, travelers and more). You can access these in the Behaviors section of the ad set targeting.
Over to You
Power Editor is a great tool to save you time if you run larger campaigns. Once you get the hang of it, using Power Editor isn’t too hard, and Facebook has definitely made big improvements in usability over the last year. I encourage you to do your own testing with some of these features to see what works best for you.
What do you think? Have you used Power Editor? What has your experience been? Share your thoughts with us in the comments below!
Note: This post originally appeared on Social Media Examiner and is reprinted with permission.
Facebook Advertising Secrets Course
If you want to go farther with Facebook Ads, be sure to check out my full Facebook Advertising Secrets course which is amazing – 4 modules covering Facebook and Instagram advertising and a private Facebook Group to ask questions! But the biggest benefit you get with the course is access to the Facebook Group where you can get all your Facebook Ad questions answered. We give feedback on ads, troubleshoot reports, and give advice on how to make your Facebook ads shine!
If you really want to grow your business quickly, Facebook Ads is the best vehicle to do that on the internet right now. Join me at www.fbadvertisingsecrets.com


Andrea:
This is the best and most concise description of Power Editor I have seen. Thank you!
Dave
So glad you liked it Dave!
Hi Andrea, I’m about to create my very first contest/ad for a client,and I’m a little nervous to mess things up, but your guidelines are terrific and will follow as of much of them as I can. I’ll let you know how I make out with Power Editor.
Excellent overview Andrea. We user Power Editor and appreciate some of the advanced features such as dark posts and day parting, both of which you mentioned. Thanks for the detailed Power Editor guide which I am sure my fans are going to appreciate 🙂
So appreciate you Andrea. Super helpful and confidence builder as I play with ads.
Aww thanks Mike! Glad to help!